There is an E-Tank hidden in the snow at the far left of the start area. This takes only a second or two to collect, and is an excellent race/no-reset strategy.
--- ### Easy way When you first start, this room isnt very scary as you can easily jump over some slinkies while preparing a Buster charge. In this clip, we are shooting the first Slinky doing an A + B combinaison of inputs while keeping the B input afterwards to hold the charge. The idea here is to kill the slinkies that are hard to avoid, if you have a good jump mashing can deal the 3 remaining shots in one jump, although it is not recommended to go for it if your jumping isnt very consistent as there is a high chance to take damage in this case. [](https://goodboyrush.net/uploads/images/gallery/2023-11/fceux-e8zy2axqyl.gif) ### Faster ways Using the same plan and with better mashing you can speed up the room quite easily by slowing down less when killing the slinkies. [](https://goodboyrush.net/uploads/images/gallery/2023-11/fceux-colvsz5psz.gif) This one adds the one jump kill at the 3rd slinky, which is quite advanced. You need a pretty good balance with movement and mashing to do it properly. [](https://goodboyrush.net/uploads/images/gallery/2023-11/fceux-njlthlacbl.gif) ### Advanced way This is the fastest way to clear this room, the idea is to kill the 2nd slinky while preparing 2 or 3 lemon shots to kill the next slinky. It's a significantly harder strat and needs a good mashing to be done properly and save time over the previous strategies. [](https://goodboyrush.net/uploads/images/gallery/2023-11/fceux-iglhdg3upe.gif) ### Fastest recorded room time Current fastest recorded room at 14'17 by **Chelney** # Room 2 - Mono Roaders This room is very short featuring 2 Mono Roaders [](https://goodboyrush.net/uploads/images/gallery/2023-11/6s5mm4monoroadersprite.webp) Something special about this room is you need to wait otherwise you will take damage and wont be able to kill them in time. You **NEED** to have a charge shot prepared while entering this room, unless you wanna do the alternative easier strat. --- ### Strategy The plan here is quite simple, you dont need go very fast at all as you will have to bait the Top Mono Roader to go left to kill him to dodge the damage. [](https://goodboyrush.net/uploads/images/gallery/2023-11/fceux-6kl2lfyfmb.gif) Here's a quick rundown: - Kill the first mono roader. - Walk until you reach the second dot of the middle ledge and prepare a second charge shot. - Jump and grab the ladder then jump off of it - Wait that the second mono roader opens - Release the shot and go as fast as you can from here ### Different Strategy In case you wanna use Bright's weapon on the [third room](https://goodboyrush.net/books/mega-man-4/page/room-3-skeleton-joes-checkpoint-room#bkmrk-beginner-way---the-b) of this stage, you can also switch it beforehand while grabbing the ladder in the first room. Using Flash Stopper to kill the mono roaders here will save a tiny bit of time as you dont need to wait for them to open. The only hard part is to time your Bright shot in time at the start of the room. You can play it a bit safer by mashing during the transition to get an early Flash but you might loose time by getting an extra shot on the ladder. [](https://goodboyrush.net/uploads/images/gallery/2023-11/fceux-hbgtaxgkok.gif) # Room 3 - Skeleton Joes (Checkpoint Room) This room is the checkpoint room of the stage. It's one of the biggest run killers especially for new runners as it's very easy to get caught by the Up'n'Down enemies [](https://goodboyrush.net/uploads/images/gallery/2023-12/mm4upndownsprite.png) if you dont pay attention or jump properly. This room also features Skeleton Joes, which you also need to take care off. --- ### Beginner way - the Bright strategy The strategy here is simple you want to use Bright so you dont have to deal with the Up'n'Down enemies, the biggest downside is depending on where you fired your second stop you might have to wait less or longer at the end to menu. Also keep in mind that as long as you have Flash Stopper enabled you can slide off ledge without any fear, you also wanna despawn the last Skeleton Joe, this would be done in almost all strategies. Thanks to this, you can avoid damage and reach the top faster. This can be done very easily by spawning the Joe and doing a little wiggle to the left. [](https://goodboyrush.net/uploads/images/gallery/2023-11/fceux-o1bgstskv4.gif) ### Buster ways ##### Easy way Now that you have to pay attention to all enemies you will need to jump quite high to dodge the Up'n'Downs. You also need to shoot the Skeleton Joes before going on the ledge or else you will bump into them. [](https://goodboyrush.net/uploads/images/gallery/2023-11/fceux-uubab1ukh0.gif)Avoid killing the Skull Joes with Full Charge Shots to avoid drops. If you took damage on an earlier screen, a life drop will break your rhythm.
##### Common way Doing high jumps and falling straight to shoot the Joes is a bit slow. You can optimize this by adding some slides out of ledges to make yourself jump lower. You can also do a jump shoot to disable the Joes earlier so you dont have to wait. [](https://goodboyrush.net/uploads/images/gallery/2023-11/fceux-xy3mubk3cc.gif) ### Faster strat The current world record uses an alternative strategy that is a tiny bit faster on average than the common strat Instead of despawning the last Joe : - Jump to dodge the Up'n'Down - Fire one buster shot to disable the Joe - Menu to Balloon as soon as the shot hit the Joe - Place the balloon high so you can lend into it and go to the top [](https://goodboyrush.net/uploads/images/gallery/2023-11/fceux-hoj13ldo1u.gif) ### Fastest Recorded Room Time The fastest recorded time is 15'42 by **Chelney** **** # Final Climbing rooms - Cossack 1 ending The final section of this track have multiple rooms where you gotta use an extra Item to climb. The first 2 rooms are almost identical, the third one is where most of the strat variances are actually important. --- ### Climb rooms #### Beginner approach Balloons hitboxes are pretty big so you can very safely place them where you need to without doing any slides [](https://goodboyrush.net/uploads/images/gallery/2023-12/fceux-notaneslwf.gif) #### Fast way You can speed up those 2 rooms: - Aligning the first balloon to the ledge so you can perform a full slide - Placing a second balloon below the 2nd ledge so you can reach the ladder quicker (this is a Balloon Jump) - Adding a ledge slide after the first balloon in the second room [](https://goodboyrush.net/uploads/images/gallery/2023-12/fceux-crl3yr1a1j.gif) Note that you dont have to add everything at once, but this is all you can do to optimize these 2 rooms. For instance, the balloon slide in the second climb room is a very small timesave, although NOT risky as most of the time you will just bonk the left side of the middle ledge. ### Triple Balloon Room This room is quite tricky, it features Ladder Presses and you have to go all the way to the left ladder while not falling. #### Safe way Before reaching the top of the ladder, press the diagonal **Up** + **Left** and then place a balloon, reach the top of the ladder, go on the balloon and place the 2 other balloons to make your way to the left ladder. Note that you will have to wait that the press open to pass. [](https://goodboyrush.net/uploads/images/gallery/2023-12/fceux-wueb6swlyk.gif) #### Safe one D-boost way To speed up, you can do one dboost on the right ladder press to skip the left ladder press you'd normally have to wait for when playing without damage by using the invicibility frames of the damage. The setup is very similiar to the safe way. You wanna place the balloons the same way but as you are jumping into the last balloon you wanna turnaround to get damage boosted to the left into the third balloon to reach the ladder afterwards, skipping the ladder press. [](https://goodboyrush.net/uploads/images/gallery/2023-12/fceux-8f1qpsqzbd.gif)Other ways to only do one damage boost somewhat safe are out there. Feel free to test what works for you in that spot.
#### Safe two D-boosts way Another safe way of doing it is to take 2 damage boosts. The safe way implies doing 2 full **A**+**B** inputs. Unlike the previous ways you wanna go to the top of the ladder immediately. Then, you perform the first **A**+**B** to place the balloon and setup yourself to be on the left side of the 1st balloon, as you land you perform the second **A**+**B** which will make you take damage but you will land on the second ballon while falling on the first balloon. Finally, you jump back on the second balloon and place the third balloon somewhat high and you slide into the ladder press while holding **Left** and **Up** so you can grab the ladder safely and move way. [](https://goodboyrush.net/uploads/images/gallery/2023-12/fceux-p5puhmlc54.gif) #### Faster two D-boosts way We can speed up that way by reducing the lag we are creating while placing the 2nd balloon. You can **A**+**B** to place the first balloon and take damage right away, you will fall right back on the first balloon, since you already are in control you can also place the second balloon a bit higher to save time. Then you place the last balloon the same as the previous shown way. [](https://goodboyrush.net/uploads/images/gallery/2023-12/fceux-a0n3bushbe.gif)Since there's only one block of the ceiling separating the ladders you actually cannot die while being crushed by the Balloon. So it's very safe to slide up there.
Taking 2 damage boosts deals a lot of damage, definitely a method to prohibit in case of low health going in here.
#### World Record way To speed up even further we can improve the movement by adding an extra slide on the first balloon. This allows us to reach the second balloon while the ladder press is still going down effectively stopping us **ON** the second balloon. Thanks to this, we have enough invicibility frames to go pass the left ladder press and therefore saving us a damage boost.This method is **VERY** hard, this requires very tight movement and uneffective movement can very easily cause big timelosses.
### Last Room The last room is a very short room that only features a single **Jumbig** in your way. #### The methods In this room, you wanna menu to Ring while climbing as your movement won't get interrupted. After the menu, you can either slide and damage boost into him [](https://goodboyrush.net/uploads/images/gallery/2023-12/fceux-yqne1gjx4e.gif) Or, to save a couple of frames you can attempt to do a backwards damage boost to get pushed very slightly to the right. [](https://goodboyrush.net/uploads/images/gallery/2023-12/fceux-ylur5udqjm.gif) #### Low health cases In case you are very low and can't afford a damage boost on that enemy, you can use an extra balloon to skip it. You need to react on the pattern as the balloon placement would be a bit different depending on how big Jumbig will jump. ##### Low pattern This method requires a quick slide and then a balloon slide. [](https://goodboyrush.net/uploads/images/gallery/2023-12/fceux-pfnobtxocs.gif) ##### High pattern This method require a quick slide and a very quick jump off the balloon. [](https://goodboyrush.net/uploads/images/gallery/2023-12/fceux-u7wa0kpkro.gif)Using an extra balloon or more here might need balloon ammo routing adjustments on later stages. Most likely Cossack 2. This method is also quite difficult and can require some practice to get used to.
##### Waiting stratetgy You can also wait that the jumbig jumps high to slide underneath it. [](https://goodboyrush.net/uploads/images/gallery/2023-12/fceux-x0aktbby07.gif)Note that this is highly unsafe as Jumbig can jump low the whole time, use at your own risk.
##### Ring Weakness The last resort method would be to kill him using Ring Boomerang this loose on average 3 seconds. [](https://goodboyrush.net/uploads/images/gallery/2023-12/fceux-swzezpfnn4.gif)If you manage to slide underneath him while trying to kill him, just abort the kill and go to the door.
# Mothraya - Cossack 1 boss fight **Mothraya** *(usually nicknamed **Moth**)* is the first boss you encounter in the Castle Stages [](https://goodboyrush.net/uploads/images/gallery/2023-12/mm4robotmothsprite.png) It's battle takes place on a two-layer pipe bridge. Mothraya can move left and right on the upper screen, attacking every 2 seconds with energy shots. It's main move is a spike-tipped "proboscis" with two attacks—one sudden dip to the floor and another where it slams down after a brief pause, breaking part of the bridge, which is usually a pretty favorable pattern in speedruns making it easier to get shots in despite the lag.The weakness is **Ring Boomerang** which combined with the one pixel hitbox of **Mothraya** makes the fight significantly harder than it looks to do properly
#### Strategy The plan is to keep a rhythm with the up and down movement while also baiting Mothraya's shots to go downwards as we jump upwards. [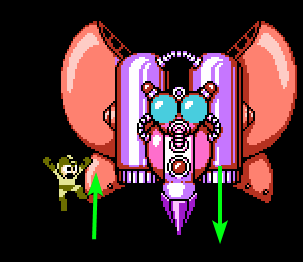](https://goodboyrush.net/uploads/images/gallery/2023-12/XQbimage.png) In order to get the shots in, we need Mothraya to go down as Mega Man goes up, that way when Mega Man reach top height, you should be aligned correctly to shot the Ring Boomerang properly. To do so, we need to walk until we reach this point from which afterwards you want to do a full jump and release the shot as you reach max height [](https://goodboyrush.net/uploads/images/gallery/2023-12/fceux-hpr0cvbhj0.png) You can use those 2 lines as a cue, here we want to jump before the first line. Afterwards, Moth will go **up** as you are falling back **down**, so then you want to wait a bit that Moth goes back down and do the same thing. Watch [Fight example](https://goodboyrush.net/books/mega-man-4/page/mothraya-cossack-1-boss-fight#bkmrk-fight-example) to have a good understanding of the timing needed.You can speed up this fight by a few frames by jumping a bit earlier in between the small left pipe and the first line
You may encounter various problems when trying to do this fight fast: - If you tend to move around a bit too much when you throw a Ring Boomerang it can cause issues when coming back to you causing you to generally loose a cycle - Trying to go to fast can make you miss in case Moth dives down quickly instead of doing it's regular movement - Going out of your rhythm can make the fight harder as you can get pushed to the left side very quickly - Dodging the bullet can be harder if you jump too fast ##### Fight example [](https://goodboyrush.net/uploads/images/gallery/2023-12/fceux-ffm0mxgqn9.gif)It's worth noting that the wings of the boss doesnt have an hitbox so you can go into them. Only the square is.
If you miss a shot don't go out of your rhythm, if you try shooting right away you will miss. Wait that Moth goes back down again just as if you didnt missed the shot