Mega Man X6
- General Information
- General Techniques
- Rainy Turtloid
- Shield Sheldon
- Infinity Mijinion
- Commander Yammark
- Blizzard Wolfgang
- Metal Shark Player
- Ground Scaravich
- Blaze Heatnix
- Gate 1
- Gate 2 - Himax
General Information
Any% Route
The Any% route confronts Gate and Sigma as quickly as possible, ignoring much of the game's content
All Stages Route
The All stages route is required to defeat all 8 mavericks in their original stages (as opposed to the refights teleporter room), before completing the final stages.
Current WR Route (2024)
- Intro Stage
- Rainy Turtloid - Get Zero from Nightmare Area
- The run uses Rainy Turtloid's stage for ease of access and two items contained in the Nightmare area, the Hyper Dash and Saber +
- Shield Shledon
- Infinity Mijinion
- Rainy Turtloid
- Gives access to Zero's invincibility glitch
- Commandar Yammark
- Blizzard Wolfgang
- Metal Shark Player
- Ground Scaravich
- Blaze Heatnix
Route Rationale
As mentioned above, Rainy Turtloid has an easily accessible nightmare area, required to collect Zero. Despite taking a long time, Zero's attacks make the run dramatically faster.
Shield Sheldon gives Zero the Guard Shell, which makes Saber Dash Cancel surprisingly more powerful. That stage and and Infinity Mijinion also rapidly build Nightmare levels and Zero's Rank, allowing him to equip items, mainly the Saber Plus, Hyper Dash, and Full Recover. (to do, add the item equiping glitch).
Turtloid's Zero Technique gives access to Zero's invincibility glitch, used in the next 3 stages.
Yammark's stage contains the Full Recover and Subtank safeties.
Ground Scaravich's stage must go after Wolfgang's to utilize the Ice Glitch Totem Skip.
Heatnix's stage goes after Metal Shark to use the charged Eagle Dive attack on the overabundance of midbosses.
General Techniques
Dashing
Base X and Zero
You can dash jump at any time while simply holding dash - you do not need to re-press it. This saves the time of the starting a dash animation and/or a player consciously pressing dash-before-jump.
Invincibility Glitch
Zero's technique from Rainy Turtloid (down+special) has a glitched invincibility property. The move makes Zero briefly invulnerable, however it can be interrupted (typically by having whatever Zero is standing on go away).
If interrupted, the game "forgets" to make Zero vulnerable again. You can use this to make Zero immune until you either use the move again to completion, or something locks Zero into place (such as a boss gate).
This is similar to a Mighty Number 9 glitch using Beck's back-jump, and interrupting it by removing the ground he stands on. Unlike MN9, Zero can walk on spikes in this state.
This allows Zero to ignore damage from enemy contact, shots, and even spiked walls. It does not, however, prevent him from getting crushed (such as Metal Shark Player's stage).
Useful Locations
This move can be executed...
- In Commander Yammark's stage, standing at the edge of one of the bugs with platforms on their backs.
- The slash will cause the bugs to curl up, removing the platform Zero is standing on
- In Wolfgang's stage, have Zero walk left towards off the first cliff in the stage, using the spin just as Zero gets to the edge.
- Zero's momentum will carry him off the edge, triggering the glitch. Look for Zero's sword to stop spinning at "2 o'clock"
- Metal Shark Player, any grey destroyable block
- The easiest of these to pull off, just destroy the block. Be careful not to use the move again
- Gate 1
- Just like Wolfgang's stage, use an icy ledge
- Gate Battle
- One of Gate's attacks draws the player into it. Use that to pull Zero off a ledge, using the move just before being pulled off
Saber Dash Cancel (SDC)
Base Technique
Zero's base attack is a triple slash. Only the third attack grants enemies and bosses invincibility frames. As such, by dashing in between slashes 1 and 3, thereby "canceling" the combo, you can do immense amounts of damage.
With Guard Shell
X6's Guard Shell is pretty broken.
Guard Shell is Glitchy
I'm probably typing this wrong but it's gotta get written down - Cab
With Guard Shell out, Zero hits much more often with his saber (as in multiple times in one jump slash). This is useful to get through many stages slightly faster than usual.
- The robot cores in Mijinion's stage take immense damage from a single jump slash
- The minor enemies in many stages (such as Turtloid) go down in one jump slash instead of surviving the first attack
More importantly, bosses take immense damage if they have something that "dinks" the attack.
(gif of turtloid and wolfgang just dying here)
Activating Guard Shell
You may need to switch between Z-Saber and Guard shell in the menu repeatedly while standing still to get this thing to work.
Rainy Turtloid
Turtloid - Map
Map pinned in discord by Kammesennin

Notable Items
- Shadow Armor Part
- Saber Plus (Nightmare Area)
- Hyper Dash (Nightmare Area)
Turtloid - First Visit - Nightmare
Acid Rain
In Any% All Stages you want to visit Turtloid first to get Zero. Not only does this stage let you do that, but this area contains two upgrades that aid the speedrun.
The nightmare area is a 2x6 section of acid rain, similar to the last section of the regular stage but taller.
| START | SABER PLUS Reploid |
| EYE | |
| EYE | |
| HYPER DASH Reploid | EYE |
| EYE | Rain Generator & Boss Gate |
Your objective like the rest of this stage is to destroy the 4 eyes then the rain generator, while rescuing the two listed reploids (There are more in this section if that concerns you).
Make use of X's charge shot to destroy the eyes from a distance (one full charge + a lemon), and get into the gate quickly.
Nightmare Zero
Nightmare Zero is weak to the Z-Saber. Using a standing slash will stun Zero, and he will teleport after a long flinch animation. Using a JUMP slash will do the weakness-damage to Zero without the flinch, meaning he will continue attacking (watch your health!), but have significantly shorter invincibility frames.
Boss - Rainy Turtloid
Zero
The strat involves Guard Shell and the Saber Dash Cancel.
Damaging Turtloid requires destroying the green gems on his shell. The Guard Shell glitch with jump slashes will make short work of it.
Once vulnerable, use dashes and slashes. Win.
Shield Sheldon
Sheldon - Map
Map pinned in discord by Kammesennin

Notable Items
- Blade Armor Part
- Weapon Tank (Nightmare Area)
Infinity Mijinion
The final Countdown
Mijinion - Map
Map pinned in discord by Kammesennin

Notable Items
- Blade Armor part (Nightmare Area)
Commander Yammark
Yammark Map
Maps pinned in discord by Kammesennin
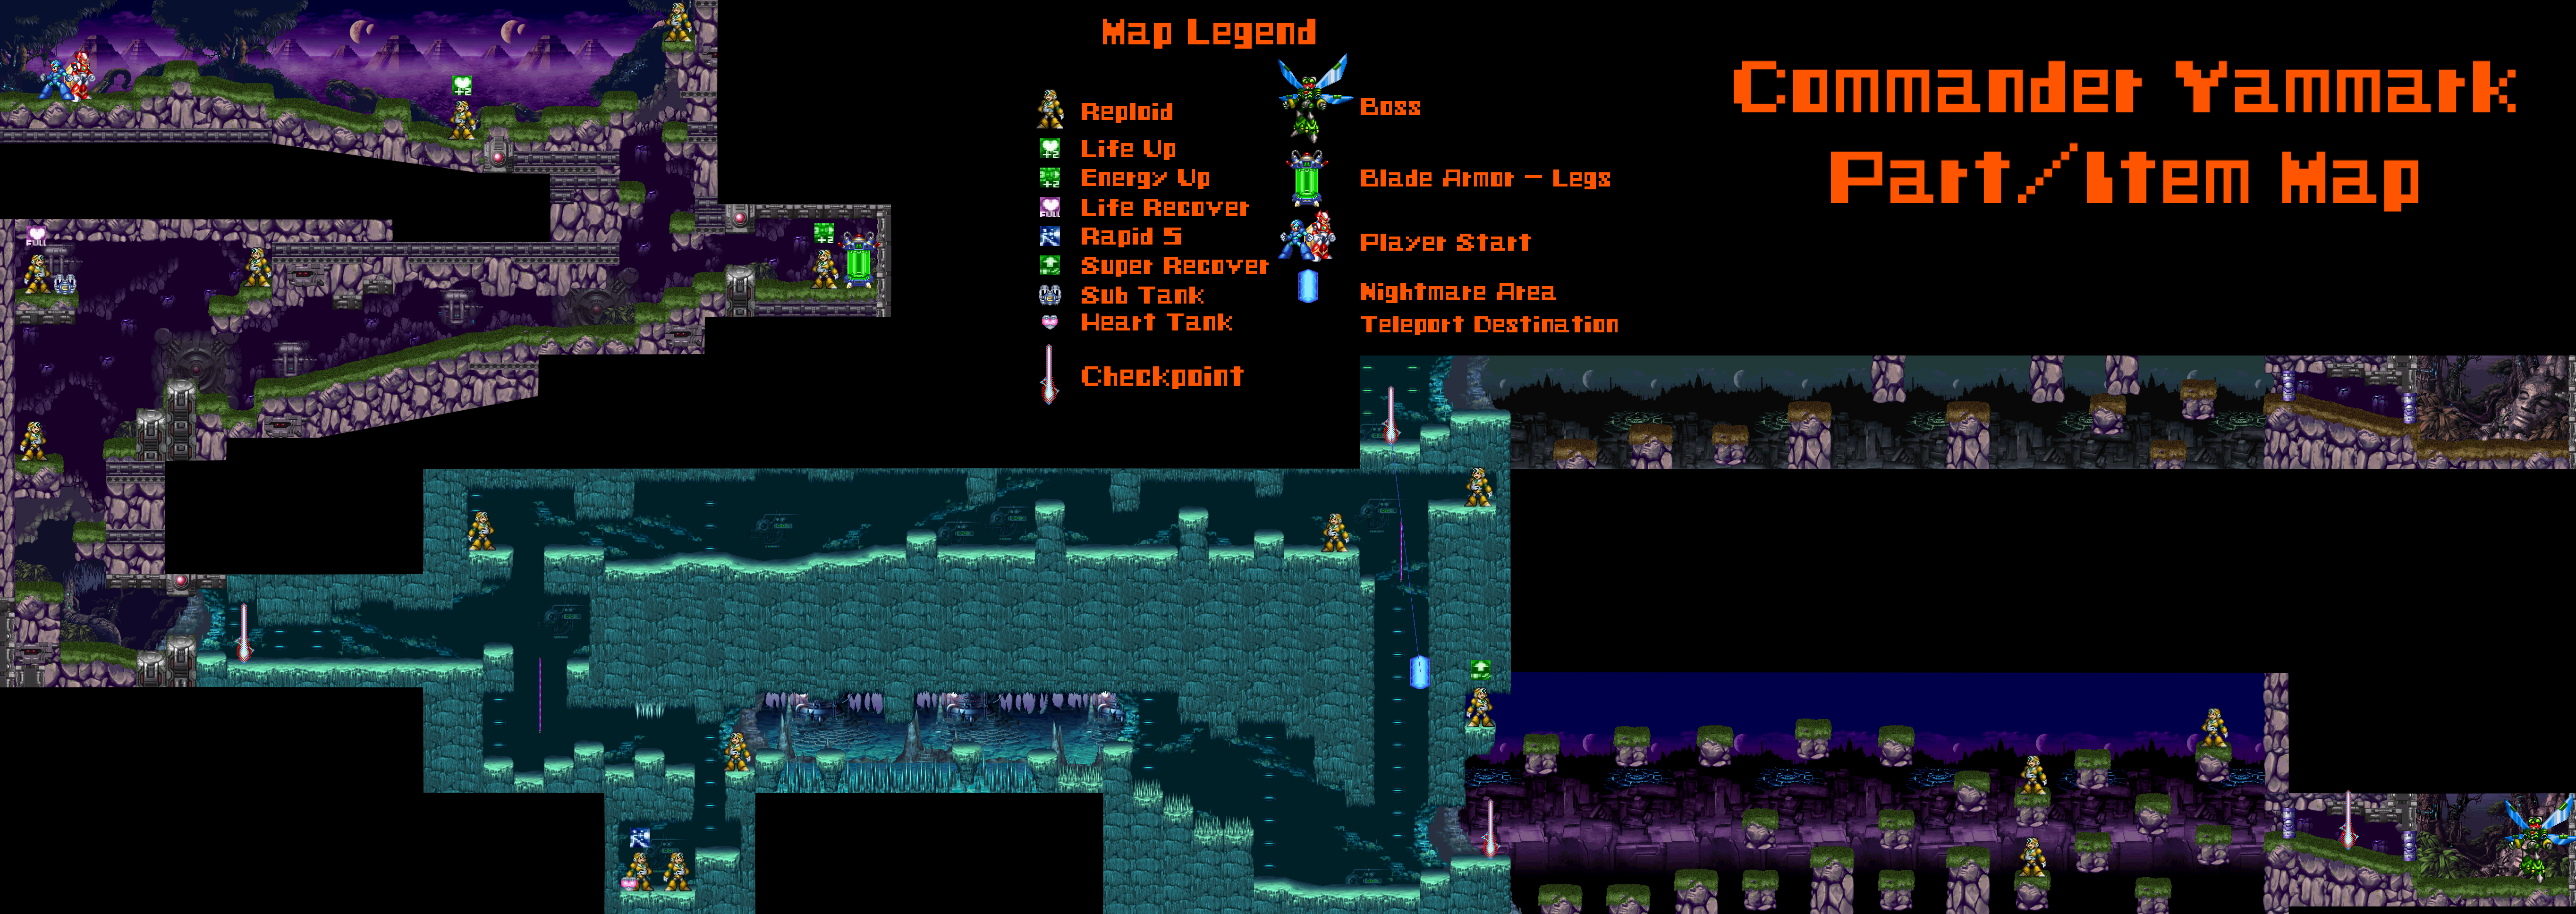
Notable Items
- Blade Armor part
- Sub Tank
- Life Recover part
Yammark 1 - Zero Glitch
In the regular All Stages speedrun route, you must have the Hyper Dash to acquire both the Sub Tank, and the Full Recover part from the reploid next to it.
There are other methods of reaching this platform, such as the Blade Armor's Upward Air Dash, that are not relevant to most categories.
Your goal early in Yammark's stage is to gain invincibility with Zero. This can be done on any of the bugs with platforms on their back.
The very first reploid in the stage has a Life Up part.
To reach the optional Sub Tank and Full Heal, dash-jump off the wall of the right side overhang. You need the Hyper Dasher to make this work.
Blizzard Wolfgang
Wolfgang - Map
Map pinned in discord by Kammesennin
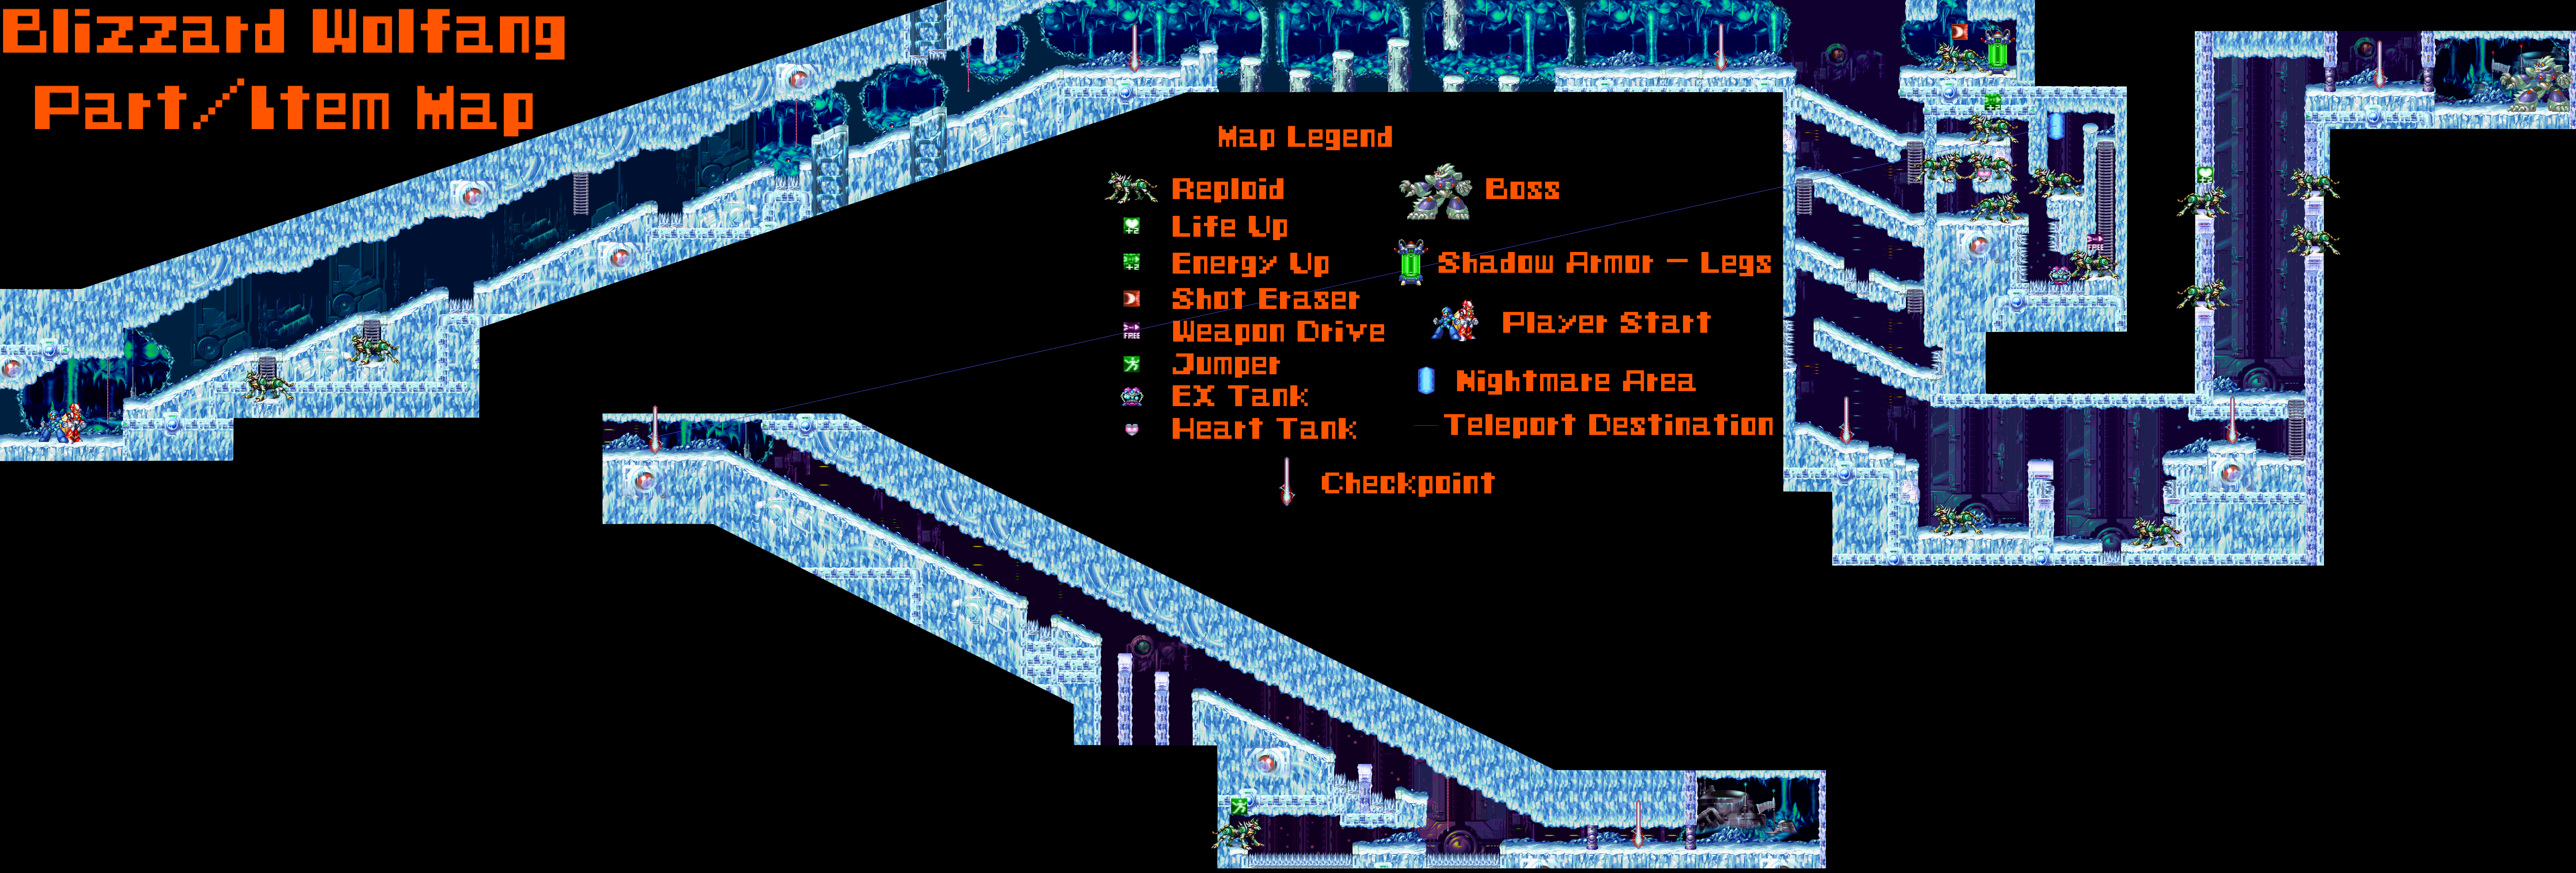
Notable Items
- Shadow Armor part
Metal Shark Player
Shark - Map
Map pinned in discord by Kammesennin

Notable Items
- Shadow Armor part
- Saber Extend
Ground Scaravich
Scaravich - Map
Map pinned in discord by Kammesennin.
Note that Scaravich's stage teleports you to seemingly random sections.
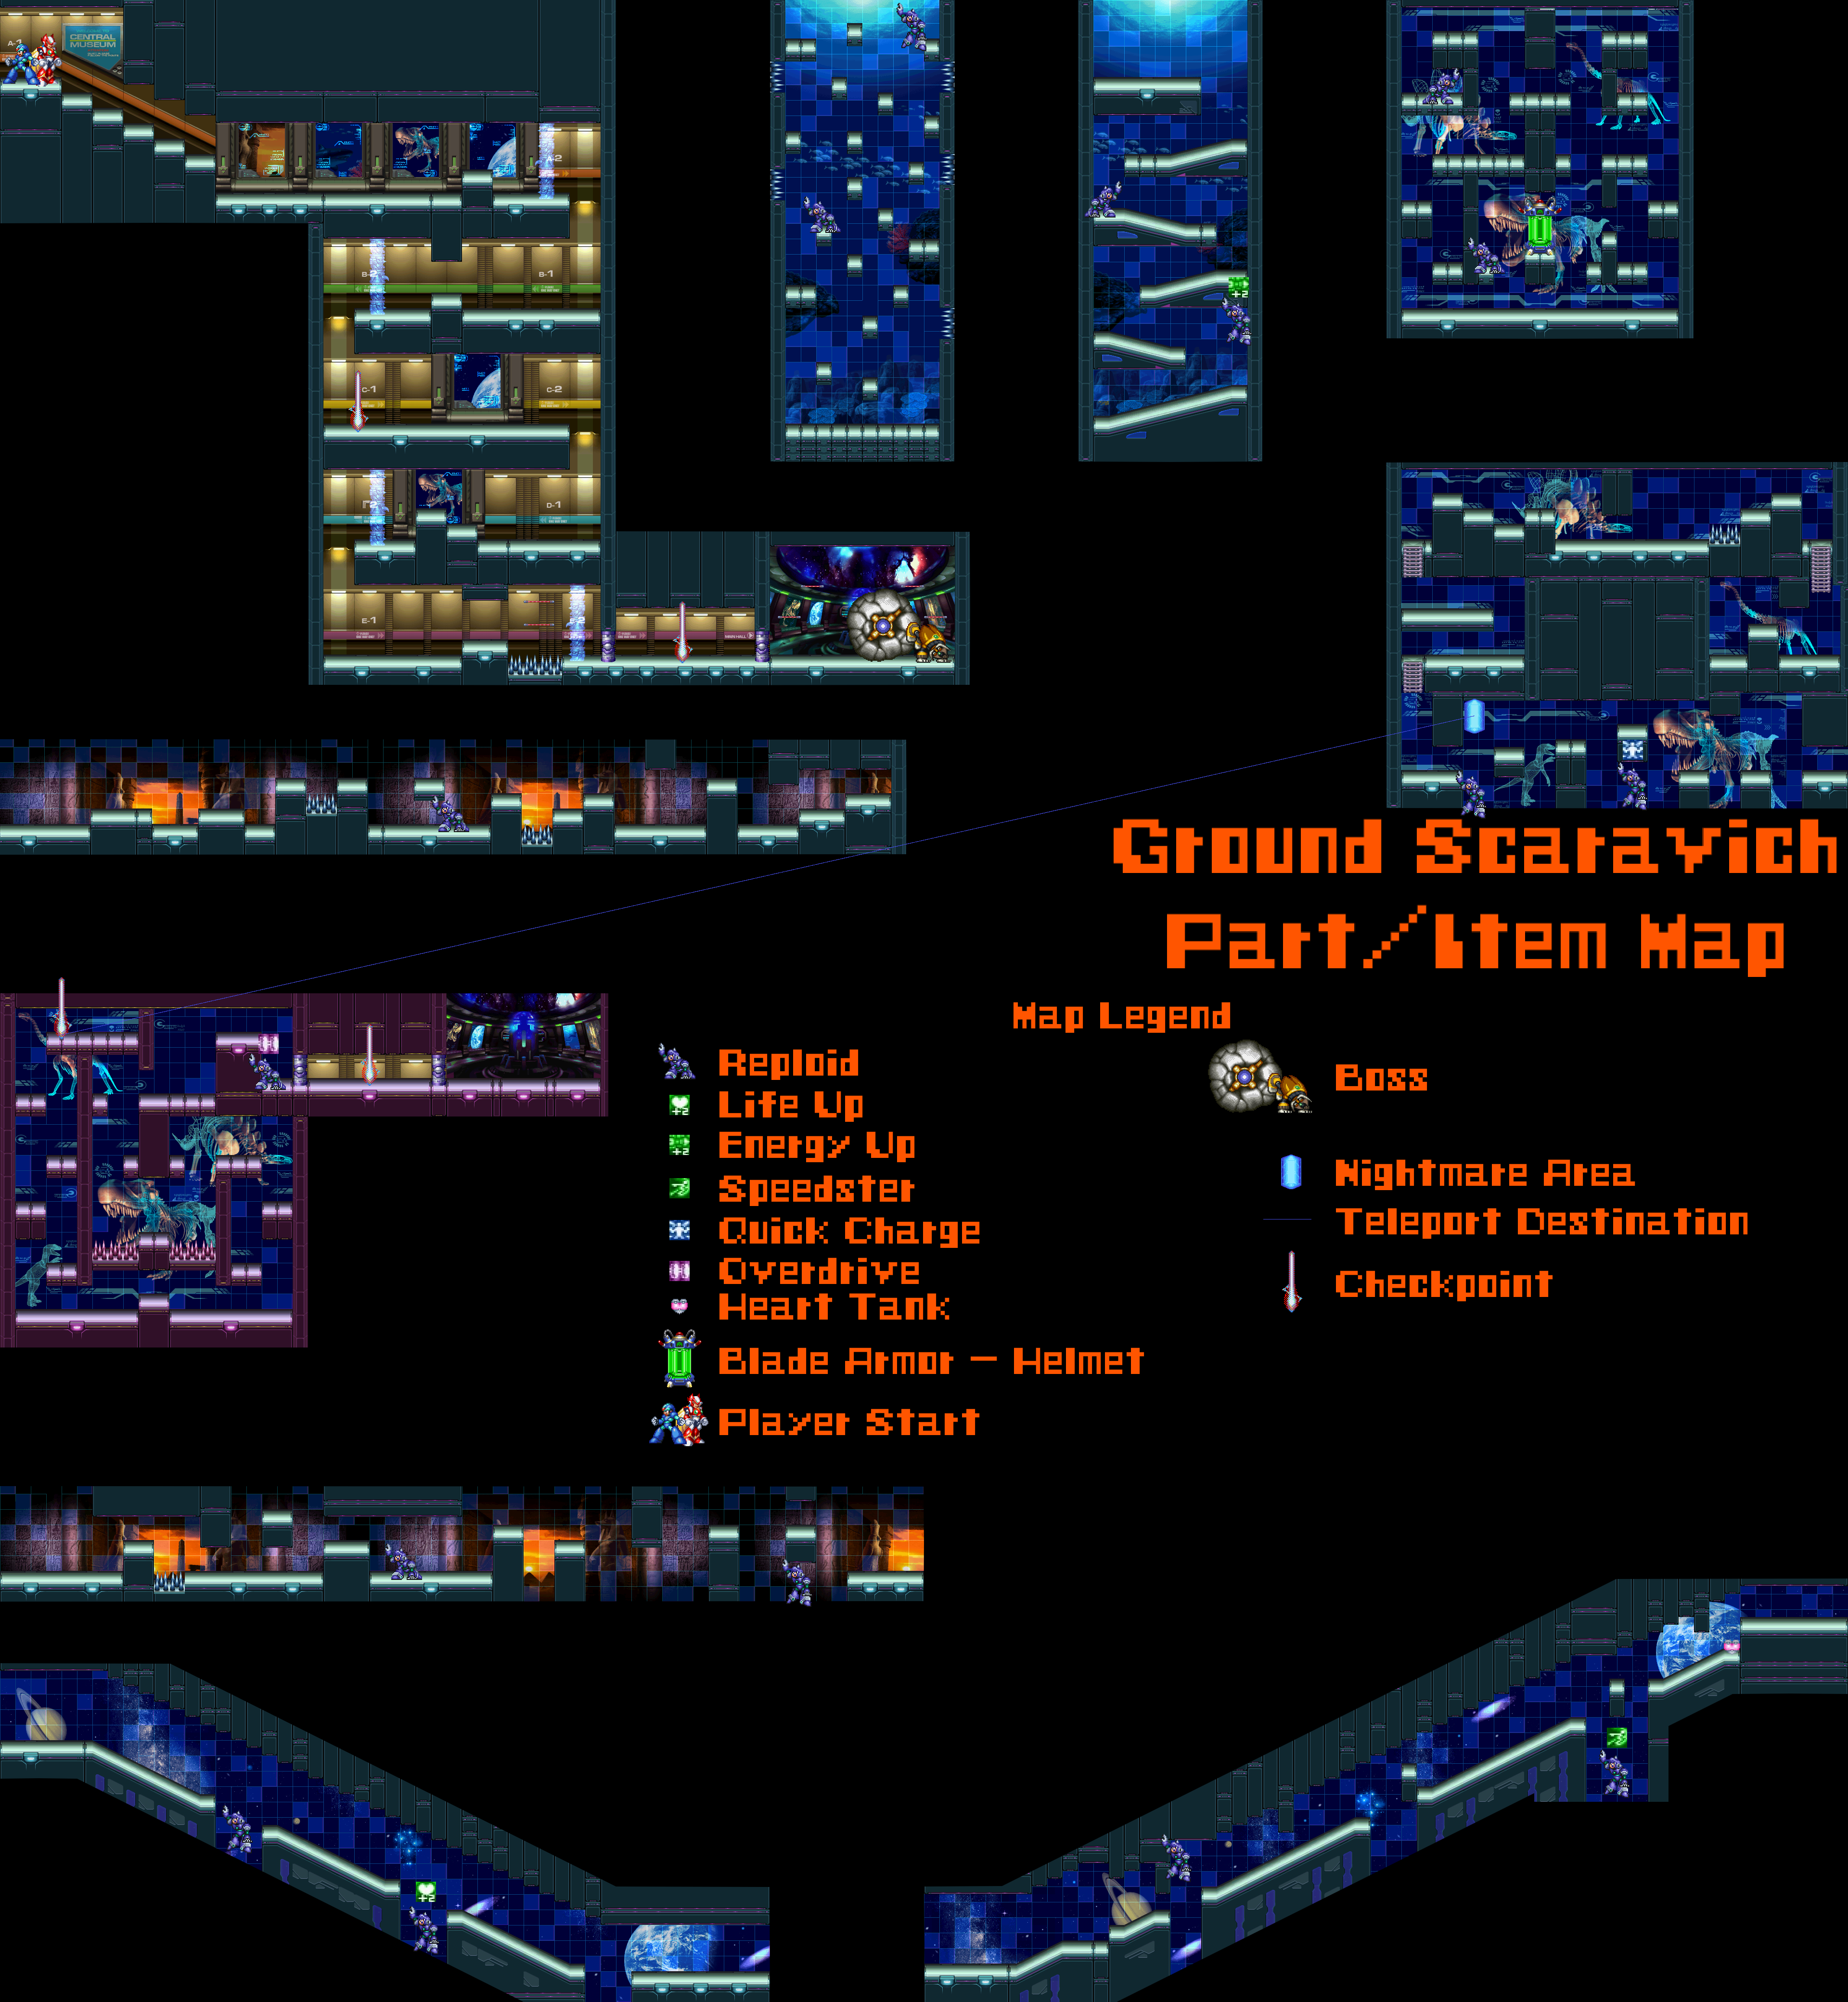
Notable Items
- Blade Armor part
- Quick Charge
Scaraovich Stage - Ice Glitch
Play this stage with Falcon-Armor X, after acquiring Wolfgang and Mijinion's weapons
There is a glitch involving Wolfgang's Ice weapon with X that lets you skip the entire stage. With some practice, you should be able to get this very consistently. The biggest issue is that you must have 4 successes with only 9 shots. If successfully executed, you do not need to enter ANY of the totem sub-levels. (Note, this also means you will not receive ANY of the items, parts, etc within them)
The Setup
Each totem is near a raised section of floor. With some practice, you should be able to
- Jump up just before the raised section
- Fire the Ice weapon
- Air-Dash to where the Ice weapon lands.
If done successfully, Mega Man will "take damage" (he'll lose 0 HP). You must use these invincibility frames to quickly move past the totem's blue outline.
On the final totem, you can hang against the wall safely and enter the boss gate.
Blaze Heatnix
I heard you like mini bosses
Heatnix - Map
Map pinned in discord by Kammesennin
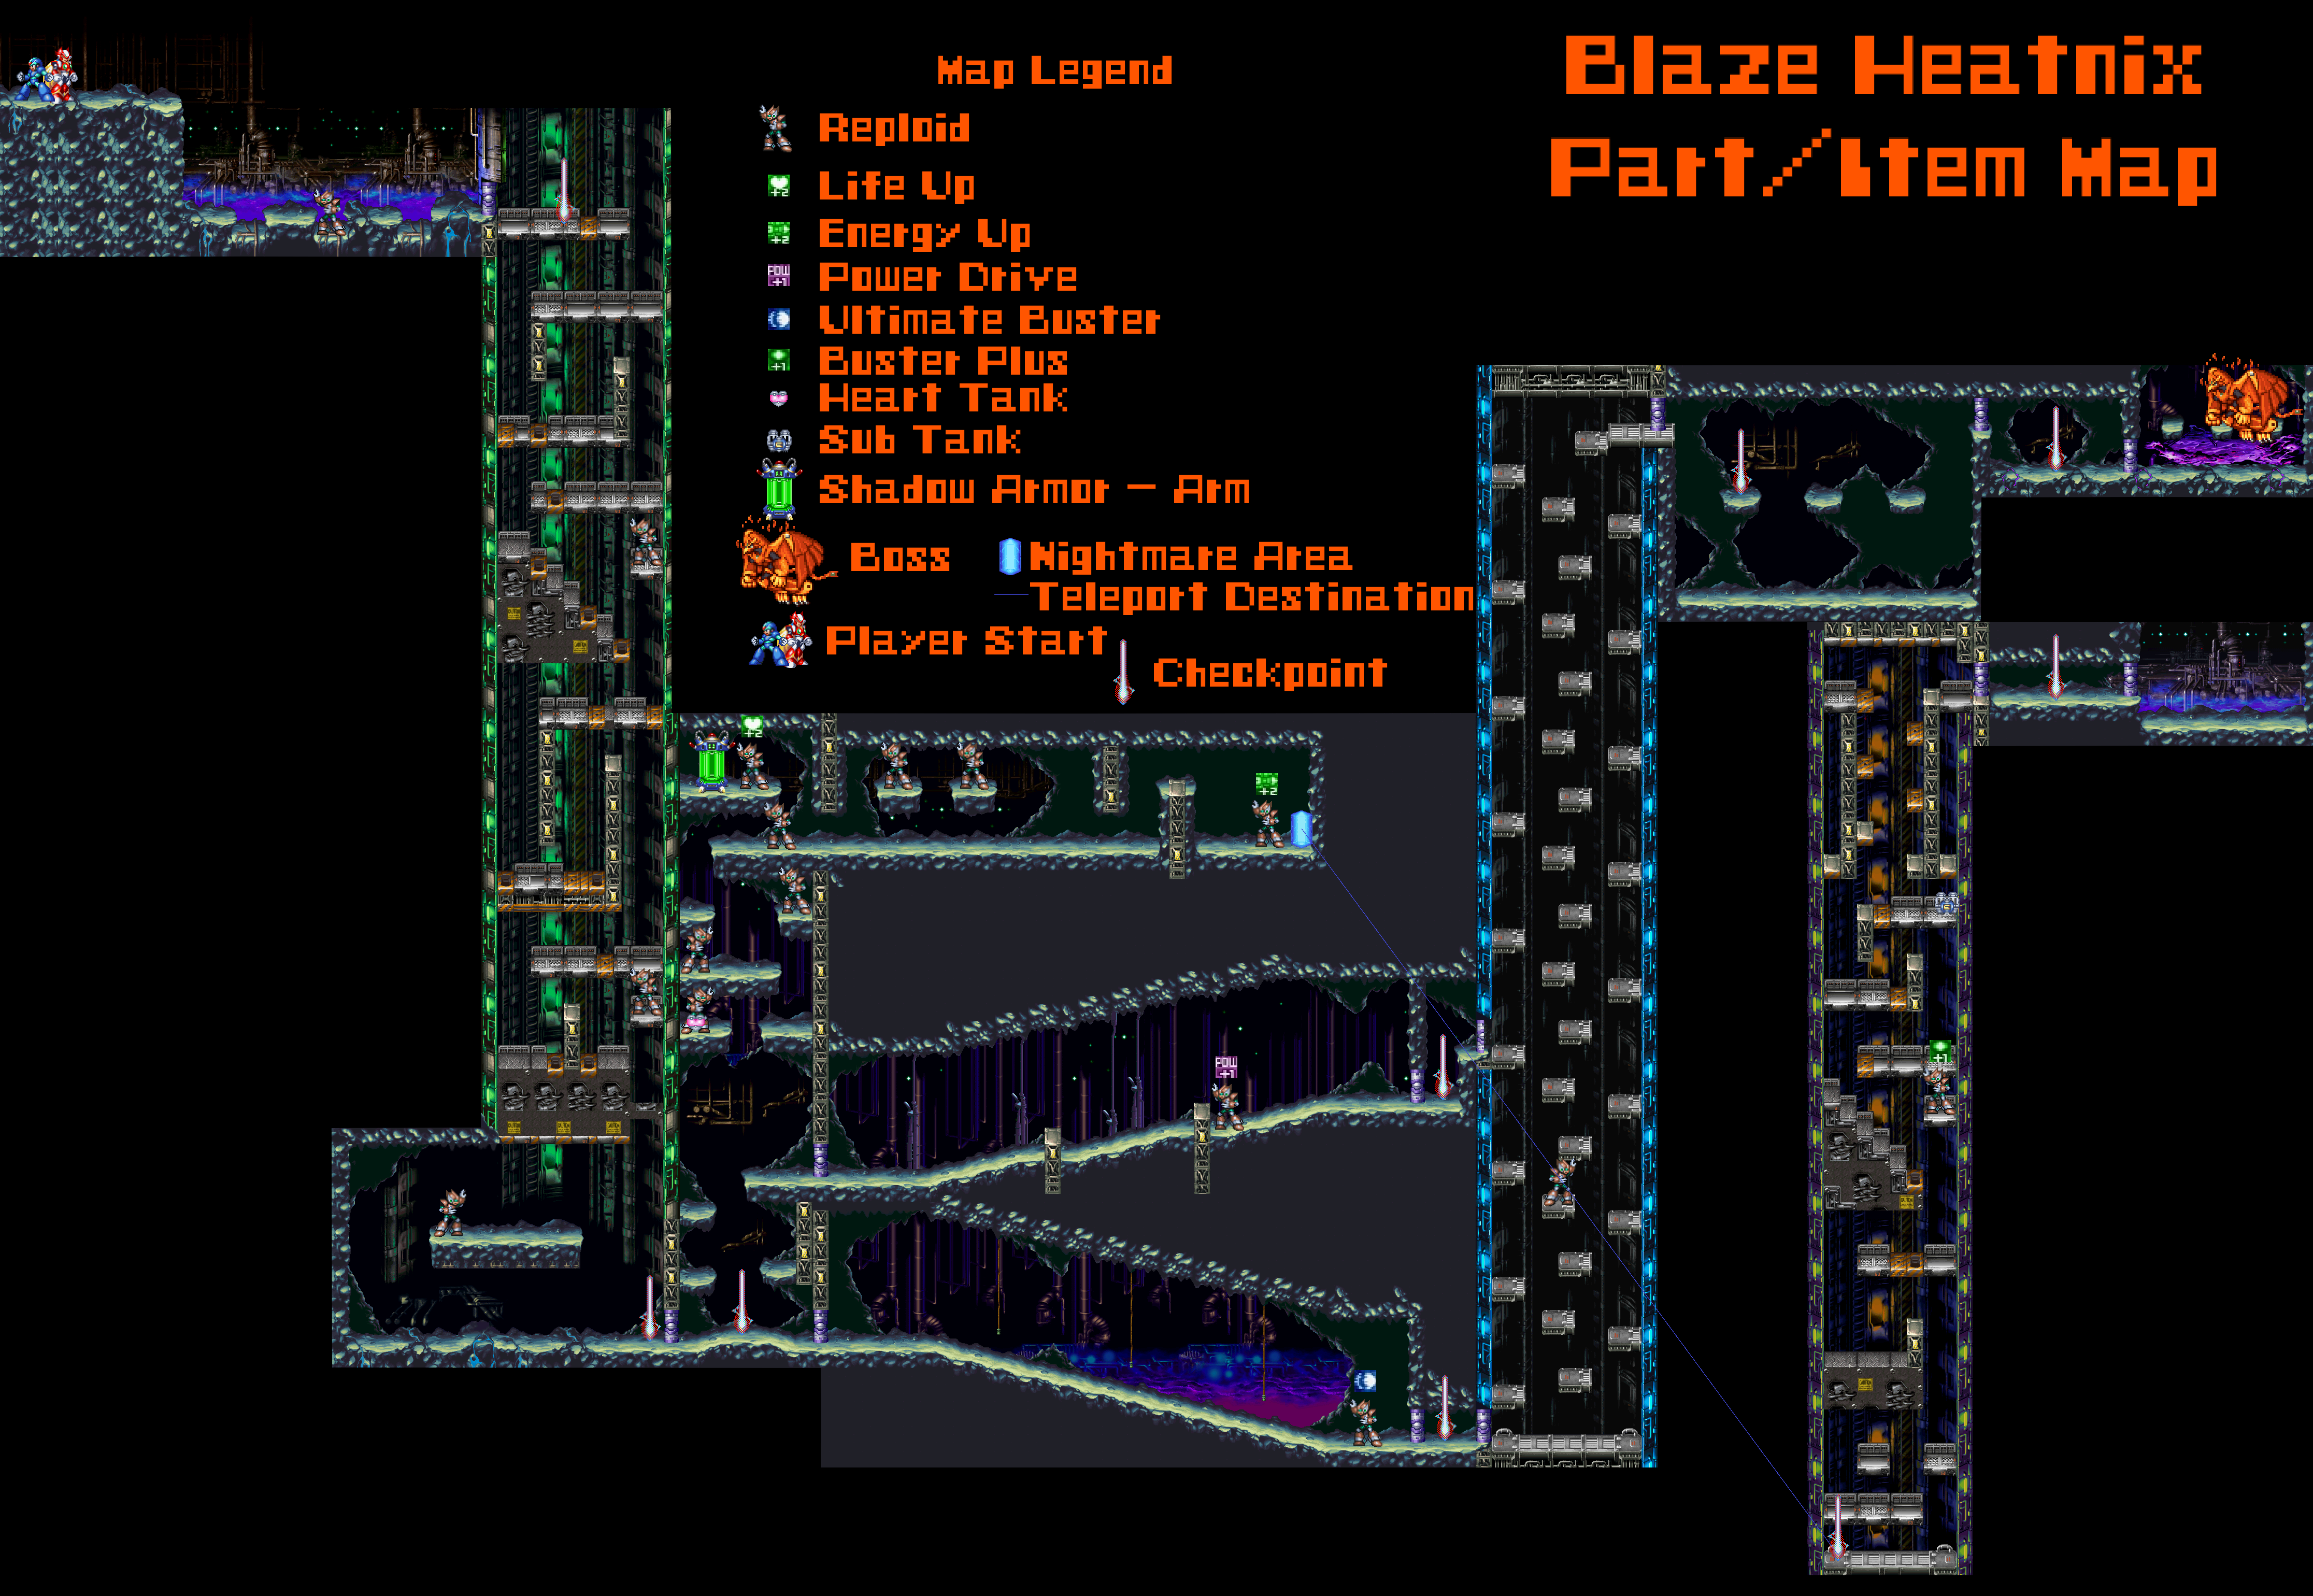
Notable Items
- Blade Armor part
- Subtank (nightmare section)
Gate 1
Gate 1 - First Climb
Stage Intro
Your movement is simply to dash-jump to the chasm holding Gate's lair. You need to mash through 3 Alia text boxes along the way.
The Climb
You are immediately met with a ton of spikes guarding walls. For the very first one, the screen snaps to the left a little, so be careful trying to jump up there.
Zero Routes
Be careful with the initial double jump up. The fastest strat is obviously to just keep jumping, but a solid safety is damage boosting off the wolves and their ice breath.
Gate 1 - Ice Slopes through Fire Room
Trigger Invincibility Glitch
Use the ice slopes to trigger Zero's invincibility glitch.
Other than that, make sane climbing and traveling decisions (also mind the pits). Try not to destroy enemies (if you are invincible) since hits freeze the game for frames at a time. You can farm for health if you absolutely need to (going slow only loses time, nothing more)
Gate 1 - Small Rising Fire Room
Dash jumping through this in one jump is possible with Hyper Dasher.
Without it, it's tighter but possible to not get killed. Don't land on the right platform - hit the wall first.
Gate 2 - Himax
The first half of Gate's second stage
Gate 2 - The Totem Despawn
First Levels
As it was explained in the X6 discord channel, I just remember you want to stay low, jumping causes the situation you don't want" (credit to JohnyGo)
Your objective in this room is to not fight any of the Totems the game puts in your path. To do this, you need to despawn the top left Totem from the first room. This requires staying low, dashing on the ground after leaving the opening area (the path under the full health drop), all the way to the raised floor before "the first intended totem".
At this point, start jumping up to get the vertical platform to spawn. It begins its movement going up, so you have to wait a cycle. After that, get on top of it with a Zero double Jump, and the top left totem should not be there while the right-side two should be.
Get up the ladder.
If you do have to fight the top right totem, keep in mind that giga attacks may affect the top totem you need to climb up the next floor quickly.
Second Levels
In the upper section, there should be another totem almost immediately after a low ceiling spike jump. Zero can use the low ceiling's wall (on the totem's side) to double jump on top of the totem, standing on it to reach the top left exit area.