# Mega Man Zero 2

# General Info

# Version Differences

The Japanese version of Mega Man Zero 2 features zips. This was patched out of the North American release.

# Weapon Experience

Mega Man Zero 2 features a weapon experience system like Zero "1". The more you use a weapon, the better Zero can use it.

Information here was originally posted in a pastebin by Kuriban - [https://pastebin.com/AFeyKueR](https://pastebin.com/AFeyKueR)

**It should be noted - Damage done during the intro stage does not affect weapon experience.**

### Z-Saber

#### Levels

<table border="1" id="bkmrk-level-xp-needed-effe" style="border-collapse: collapse; width: 100%; height: 236.8px;"><tbody><tr style="height: 29.6px;"><td style="height: 29.6px;">**Level**</td><td style="height: 29.6px;">**XP needed**</td><td style="height: 29.6px;">**Effect**</td></tr><tr style="height: 29.6px;"><td style="height: 29.6px;">1 (Start)</td><td style="height: 29.6px;">0</td><td style="height: 29.6px;">Single sword slash. Normal jump slash. No elemental effects</td></tr><tr style="height: 29.6px;"><td style="height: 29.6px;">2</td><td style="height: 29.6px;">30</td><td style="height: 29.6px;">2 standing slash combo</td></tr><tr style="height: 29.6px;"><td style="height: 29.6px;">3</td><td style="height: 29.6px;">90</td><td style="height: 29.6px;">3 standing slash combo</td></tr><tr style="height: 29.6px;"><td style="height: 29.6px;">4</td><td style="height: 29.6px;">290</td><td style="height: 29.6px;">Can Charge saber attack and apply elemental chip damage</td></tr><tr style="height: 29.6px;"><td style="height: 29.6px;">5</td><td style="height: 29.6px;">850</td><td style="height: 29.6px;">"Quick Charge" (for saber)</td></tr></tbody></table>

#### XP Table

<table border="1" id="bkmrk-attack-xp-gained-nor" style="border-collapse: collapse; width: 100%;"><tbody><tr><td>**Attack**</td><td>**XP Gained**</td></tr><tr><td>Second Combo Slash</td><td>2</td></tr><tr><td>Third Combo Slash</td><td>4</td></tr><tr><td>Charge Slash</td><td>8</td></tr><tr><td>Everything Else</td><td>1</td></tr></tbody></table>

### Z-Buster

#### Level Table

<table border="1" id="bkmrk-level-xp-needed-effe-1" style="border-collapse: collapse; width: 100%; height: 236.8px;"><tbody><tr style="height: 29.6px;"><td style="height: 29.6px;">**Level**</td><td style="height: 29.6px;">**XP needed**</td><td style="height: 29.6px;">**Effect**</td></tr><tr style="height: 29.6px;"><td style="height: 29.6px;">1 (Start)</td><td style="height: 29.6px;">0</td><td style="height: 29.6px;">  
</td></tr><tr style="height: 29.6px;"><td style="height: 29.6px;">2</td><td style="height: 29.6px;">200</td><td style="height: 29.6px;">Full charge shot, Elemental effects</td></tr><tr style="height: 29.6px;"><td style="height: 29.6px;">3</td><td style="height: 29.6px;">600</td><td style="height: 29.6px;">Quick Charge (for buster)</td></tr></tbody></table>

#### XP Table

<table border="1" id="bkmrk-attack-xp-gained-lem" style="border-collapse: collapse; width: 100%;"><tbody><tr><td>**Attack**</td><td>**XP Gained**</td></tr><tr><td>Lemons</td><td>1 (including boss iframes)</td></tr><tr><td>Half Charge</td><td>2</td></tr><tr><td>Full Charge</td><td>4</td></tr></tbody></table>

### Chain Rod

#### Level Table

<table border="1" id="bkmrk-level-xp-needed-effe-2" style="border-collapse: collapse; width: 100%; height: 118.4px;"><tbody><tr style="height: 29.6px;"><td style="height: 29.6px;">**Level**</td><td style="height: 29.6px;">**XP needed**</td><td style="height: 29.6px;">**Effect**</td></tr><tr style="height: 29.6px;"><td style="height: 29.6px;">1 (Start)</td><td style="height: 29.6px;">0</td><td style="height: 29.6px;">  
</td></tr><tr style="height: 29.6px;"><td style="height: 29.6px;">2</td><td style="height: 29.6px;">50</td><td style="height: 29.6px;">Full charge, Elemental effects</td></tr><tr style="height: 29.6px;"><td style="height: 29.6px;">3</td><td style="height: 29.6px;">210</td><td style="height: 29.6px;">Quick Charge (for chain)</td></tr></tbody></table>

#### XP Table

<table border="1" id="bkmrk-attack-xp-gained-nor-1" style="border-collapse: collapse; width: 100%;"><tbody><tr><td>**Attack**</td><td>**XP Gained**</td></tr><tr><td>Normal</td><td>1</td></tr><tr><td>Charged</td><td>2 (per hit)</td></tr></tbody></table>

### Shield Boomerang

#### Level Table

<table border="1" id="bkmrk-level-xp-needed-effe-3" style="border-collapse: collapse; width: 100%; height: 118.4px;"><tbody><tr style="height: 29.6px;"><td style="height: 29.6px;">**Level**</td><td style="height: 29.6px;">**XP needed**</td><td style="height: 29.6px;">**Effect**</td></tr><tr style="height: 29.6px;"><td style="height: 29.6px;">1 (Start)</td><td style="height: 29.6px;">0</td><td style="height: 29.6px;">  
</td></tr><tr style="height: 29.6px;"><td style="height: 29.6px;">2</td><td style="height: 29.6px;">30</td><td style="height: 29.6px;">Mid Range throw</td></tr><tr style="height: 29.6px;"><td style="height: 29.6px;">3</td><td style="height: 29.6px;">80</td><td style="height: 29.6px;">Long Range throw</td></tr></tbody></table>

#### XP Table

<table border="1" id="bkmrk-attack-xp-gained-cha" style="border-collapse: collapse; width: 100%;"><tbody><tr><td>**Attack**</td><td>**XP Gained**</td></tr><tr><td>Charge Attack</td><td>1</td></tr><tr><td>"Point Blank" Charge Attack</td><td>2-3</td></tr></tbody></table>

# Item Locations

Many of these are safety items, but they are listed here for convenience. This is not a complete list of elves.

### Sub Tanks

#### Actual Tanks

Ourobockle's stage - near the end before the crusher screen. Pull the block down to the spikes below, then cross the spikes to the left (Dash jump or Strike Chain grappling)

[![image.png](https://goodboyrush.net/uploads/images/gallery/2025-04/scaled-1680-/rCuimage.png)](https://goodboyrush.net/uploads/images/gallery/2025-04/rCuimage.png)

#### Cyber Elves

<table border="1" id="bkmrk-elf-name-stage-energ" style="border-collapse: collapse; width: 100%; height: 302.5px;"><colgroup><col style="width: 9.53251%;"></col><col style="width: 9.65167%;"></col><col style="width: 8.4601%;"></col><col style="width: 42.7814%;"></col><col style="width: 29.6657%;"></col></colgroup><tbody><tr style="height: 29.6px;"><td style="height: 29.6px;">**Elf Name**</td><td style="height: 29.6px;">**Stage**</td><td style="height: 29.6px;">**Energy**</td><td style="height: 29.6px;">**Location**</td><td style="height: 29.6px;">  
</td></tr><tr><td>Estan</td><td>Neo Arcadia (1)</td><td>700</td><td>Early in the stage, behind a large block movable with the Chain Rod.

Fire the chain rod into the block, then press "away" then the chain connects.

</td><td>[![image.png](https://goodboyrush.net/uploads/images/gallery/2025-04/scaled-1680-/haTimage.png)
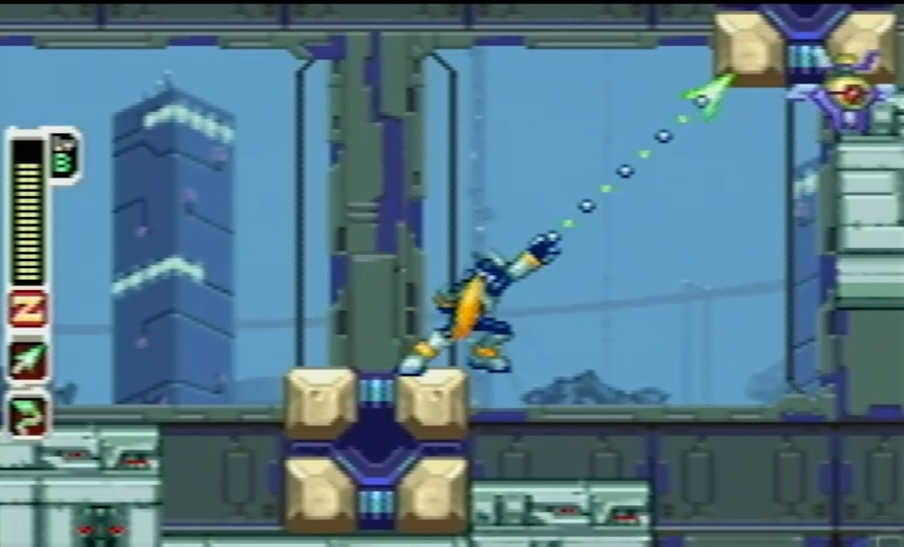
](https://goodboyrush.net/uploads/images/gallery/2025-04/haTimage.png)

</td></tr></tbody></table>

### Life Upgrades

<table border="1" id="bkmrk-elf-name-stage-energ-1" style="border-collapse: collapse; width: 100%; height: 302.5px;"><colgroup><col style="width: 9.53251%;"></col><col style="width: 9.65167%;"></col><col style="width: 8.4601%;"></col><col style="width: 42.7814%;"></col><col style="width: 29.6657%;"></col></colgroup><tbody><tr style="height: 29.6px;"><td style="height: 29.6px;">**Elf Name**</td><td style="height: 29.6px;">**Stage**</td><td style="height: 29.6px;">**Energy**</td><td style="height: 29.6px;">**Location**</td><td style="height: 29.6px;">  
</td></tr><tr style="height: 154.5px;"><td style="height: 154.5px;">Grandie</td><td style="height: 154.5px;">Phoenix</td><td style="height: 154.5px;">300

700

</td><td style="height: 154.5px;">Use the bombs to destroy the top wall in the first long indoor section, just before the red platform. The red platform can be destroyed by bombs.

The elf is up above in a box

**This elf doubles Zero's HP**

</td><td style="height: 154.5px;">[![image.png](https://goodboyrush.net/uploads/images/gallery/2025-04/scaled-1680-/image.png)
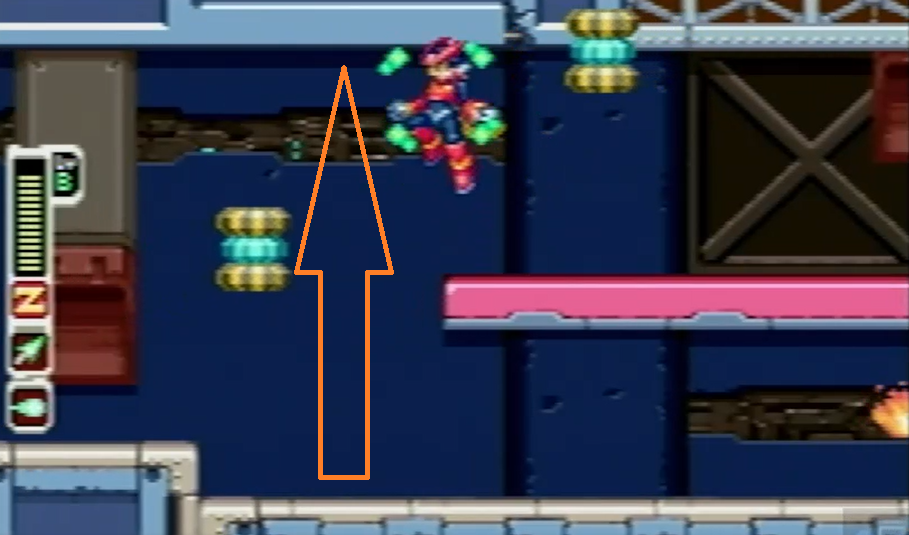
](https://goodboyrush.net/uploads/images/gallery/2025-04/image.png)

</td></tr><tr style="height: 29.6px;"><td style="height: 29.6px;">Euppie</td><td style="height: 29.6px;">Fefnir</td><td style="height: 29.6px;"></td><td style="height: 29.6px;">under ladder beneath big green cannon Pantheon.

</td><td style="height: 29.6px;"></td></tr><tr style="height: 29.6px;"><td style="height: 29.6px;">Fuppie</td><td style="height: 29.6px;">Poler Kamrous</td><td style="height: 29.6px;"></td><td style="height: 29.6px;">In a box above the door leaving the Ice Golem's room.

</td><td style="height: 29.6px;">[![image.png](https://goodboyrush.net/uploads/images/gallery/2025-04/scaled-1680-/Mjkimage.png)
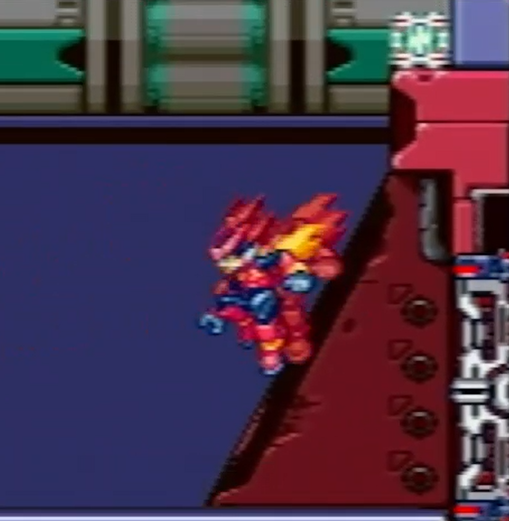
](https://goodboyrush.net/uploads/images/gallery/2025-04/Mjkimage.png)

</td></tr><tr style="height: 29.6px;"><td style="height: 29.6px;">Mappie</td><td style="height: 29.6px;">Burble</td><td style="height: 29.6px;"></td><td style="height: 29.6px;">in the box through hidden passage below ruins entrance.

</td><td style="height: 29.6px;"></td></tr><tr style="height: 29.6px;"><td style="height: 29.6px;">Yeppie</td><td style="height: 29.6px;">Ourobockle</td><td style="height: 29.6px;"></td><td style="height: 29.6px;">hidden in the trees near the start

</td><td style="height: 29.6px;"></td></tr></tbody></table>

### Damage

Removes half of a boss's health

<table border="1" id="bkmrk-elf-name-stage-energ-2" style="border-collapse: collapse; width: 100%;"><colgroup><col style="width: 10.9624%;"></col><col style="width: 8.57926%;"></col><col style="width: 10.1283%;"></col><col style="width: 44.5697%;"></col><col style="width: 25.7326%;"></col></colgroup><tbody><tr><td>**Elf Name**</td><td>**Stage**</td><td>**Energy**</td><td>**Location**</td><td>  
</td></tr><tr><td>Hafmardo</td><td>Poler</td><td>300</td><td>Dropped by the Ice Golem after defeating it.</td><td>[![image.png](https://goodboyrush.net/uploads/images/gallery/2025-04/scaled-1680-/9NDimage.png)
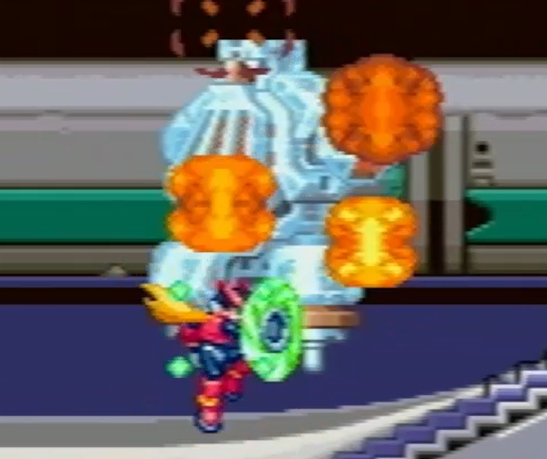
](https://goodboyrush.net/uploads/images/gallery/2025-04/9NDimage.png)

</td></tr></tbody></table>

# Z2 Rank & EX Skills

Defeating bosses while starting the stage with (at least) A-Rank will give Zero an EX Skill.

# Intro

# Panther

# Phoenix

# Phoenix - Furnaces

There are 4 furnace rooms required to fight Phoenix. Each of them can be defeated with a Shield trick.

- Have The Shield and Thunder chip equipped.
- Enter the room with a Shield attack charged up
- Walk into the room and launch the shield just before hitting the ground

This timing should destroy each furnace in a single attack.